How to: Add Auto-Response For Text Messages
Auto Responses can be added to a text message to allow your participant to text back and receive additional, preset information. These responses can also send additional messages, create new chats (including adding a subject or assigning to a user), add report values, or provide additional information through a response message. Traditionally, we see this feature used for appointment reminder messages where the participant can confirm or reschedule their appointments.
There are two types of auto responses that can be set up on the message, one that looks for specific keywords, phrases, letters, numbers, and a default response that will be sent for all responses received.
Note: This advanced auto response feature is only available for text messaging.
- For information on how to create a text message, please visit: How to: Create a Text Message
- For information about touch tone responses (auto replies) for voice messages, please visit: How to: Utilize Advanced Voice Messaging Settings
- For information on creating email messages, please visit: How To: Create an Email Message
Add an Auto Response to an existing Text Message:
- Within the 2 Contents section of a message, click the Edit
option under Text to open the message for editing.
- In the Main Text Message Script box, update the message text to include the directions for what Reply Text (keyword, phrase, letter, or number) you wish to use.
Skip this step if you want to configure the settings for any reply received.
Example: Asking the participant to respond with: text 1 to confirm or 2 to reschedule an appointment.- Press the Add Auto Response
button to open the Response Settings or choose the Add Default Auto Response
button to open the Default Response Settings.
Note: The Default Response Settings do not have a Reply Text section because they are sent to all responses that are received; that do not match any other existing Reply Text keyword, phrase, letter, or number.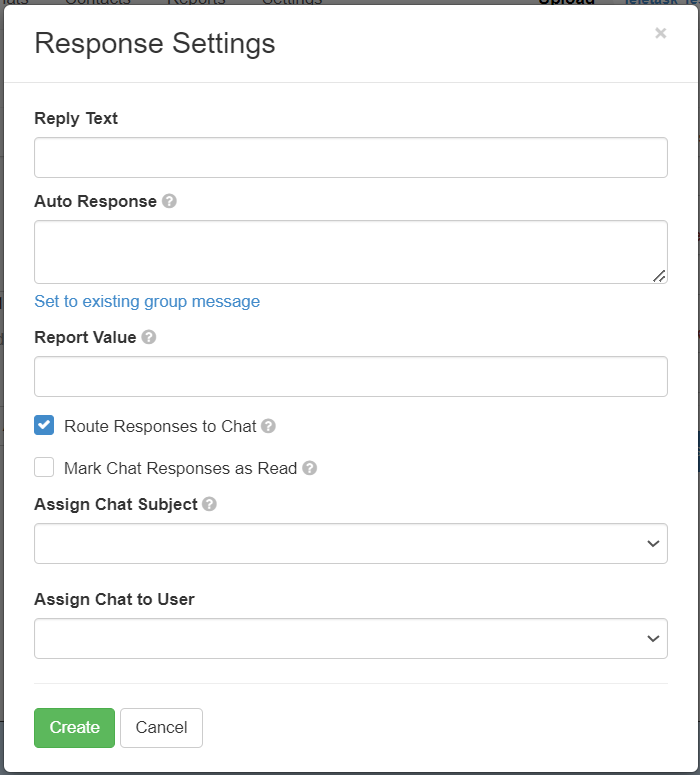
- Under the Reply Text box, enter the keyword, phrase, letter, or number that you want the participant to respond with. The Reply Text is not case sensitive.
Skip this step for Default Response Settings, as it will be sent to any replies that do not match existing Reply Text.- Choose to add an Auto Response text message or Trigger an existing group message. If the Auto Response field is empty, no response will be sent.
- Auto Response: Type an Auto Response message that will be sent to the recipient when the Reply Text is received. You can include Merge Tags, Web Surveys, or Media Files in the text box.
Note: We recommend configuring this message as a text message and then copying over the message to the Auto Response field to make sure any custom links and Merge Tags are configured correctly. You can re-size the field by right-clicking and dragging on the bottom right-hand cornericon.
- For more information about Merge Tags, please visit: How to: Create a Text Message
- For more information about Web Surveys, please visit: How to: Create a Web Survey
- For more information about Media files, please visit: How To: Add and Send Media Files
- Trigger Message: Trigger an existing Group Message to send as an auto response by selecting the Set to existing group message link
. This allows you to nest multiple messages within your main message. The field title will change to Trigger Message and provide a drop-down menu of existing Group Messages you can choose from.
- OPTIONAL: Add a Report Value to indicate what the response means to you. This will replace the Reply Text with the Report Value in reports and chat. When the Report Value field is empty the original reply message will be displayed.
- For more information about Reports, please visit: How To: Create On Demand Reports
- OPTIONAL: To open a new chat on the Chat page of the web portal, check the box for Route Responses to Chat. This chat will open as Unread and Unassigned without a Subject associated with it.
Note: The option to Route Responses to Chat must be checked if you want to utilize the options Mark Chat Responses as Read, Assign Chat Subject, or Assign Chat to User (Optional Steps 8-10).- OPTIONAL: To leave the chat Open but left in the Read status, check the box for Mark Chat Responses as Read. If the chat was already in the Unread status before the Reply Text is received, it will remain Unread.
- OPTIONAL: To assign an existing subject to the chat, use the drop-down menu to select the subject under the Assign Chat Subject heading.
Note: Removing a chat subject from the Chat Settings will result in any auto-responses with that assigned chat subject to appear with a blank chat subject, both in Chats and Reports.
- For more information about creating chat subjects, please visit: How to: Add Subjects to Chat
- OPTIONAL: To assign an existing user to the chat, use the drop-down menu to select a user under the Assign Chat to User heading.
Note: Please verify the user the chat is being assigned to has access to the Chats page on the web portal.
- For more information about adding users, please visit: How to: Add a New User
- Once you have made your selections, click the Create
button to save the settings. The Reply Text and Settings button will appear beneath the main message. To make changes, press the Settings button.
The Add Default Response button will turn blue and be relabeled to Default Responsewhen completed. Press the Default Response button to make any changes to these settings.
- OPTIONAL: Repeat Steps 3 through 11 to add additional Reply Text options or to add the Default Auto Reply option.
- Select the green Next
button in the bottom right corner to save your changes, the Auto Responses are now live and ready to be used.
Add an Automatic Follow-up Response to an existing Text Message
 Note: This advanced auto response feature is available in English language messages only.
Note: This advanced auto response feature is available in English language messages only.
- Within the 2 Contents section of a message, click the Edit
- Press the Follow-up Message
button to open a panel to create your Follow-up Message.
Note: The follow-up message must first be created as a Group Message. For information on how to create a Group Message, please visit How To: Create a Group Message - Select the Group Message you wish to send from the drop-down menu:
- Select the timing option in the second drop-down menu. This will determine the interval at which the follow-up message will be sent after the original message is delivered.
- Click the Create
button to save your changes.
- OPTIONAL: To edit or delete your automatic follow-up message, click on the Follow-up Message
button again (note how it is changed blue after a message is created) and you will be directed to a window to edit or delete your configurations:
- Click Update to save your changes.
- Click Delete to delete the response message settings entirely.
Related Articles
How to: Create a Text Message
How to create or edit an existing text message: Create a message or locate the message you want to edit. For more information on how to create a message visit: Messages Page Within the Contents section of a Message, select the Start or Edit option ...Messages Page
Overview The Messages Page shows lists of your current messages and surveys. It allows you to manage their content and offers the ability to create new messages. The Messages Page is where you can answer questions such as: How do I update the ...How to: Set-up Out of Office Auto-Response for Chat
An Out of Office Auto-Response allows you to configure an auto response to send when the Office or Clinic is closed or when responses are received outside of normal working business hours. To learn more about creating an Out of Office Auto-Response, ...Teletask, Inc: Text Message Verification Requirements
In order to use Teletask for sending text messages, we have to submit the phone number for validation. This applies for both toll free and local numbers. The validation process was created by the phone providers to be in compliance with the FCC ...How to: Utilize Advanced Settings and Group Rules for Messages
The Advanced Settings and Group Rules option offers the ability to customize your messages. Advanced Settings allow you to select the timing for multiple messages. Group Rules allows you to specify criteria for when a unique message to be sent. The ...